
Routes
A route is an ordered list of waypoints. You plan it in advance, then follow it leg by leg with live steering guidance.
Creating a route
Two ways to start:
- From the chart — right-click / long-press where the route should begin and choose Route from here.
- From the Routes panel — open Routes (RTE), then tap New.
Either way you're now in edit mode: each tap on the chart appends a waypoint. Waypoints are auto-named after nearby charted features (buoys, lights, points) when there's one close by, so a route reads like "Castle Is. → President Roads → Deer Is." without any typing. A dashed preview line follows the cursor to the next tap.
Tap Done to save, or Cancel to discard. Route names default to something sensible; double-click the name (in the Routes panel or the route's own panel) to rename.
Editing a route
Open Routes, and tap the pencil (Edit) on the route's row. The editing toolbar appears at the top, and the route's waypoint list stays open alongside so you can work by name or by chart:
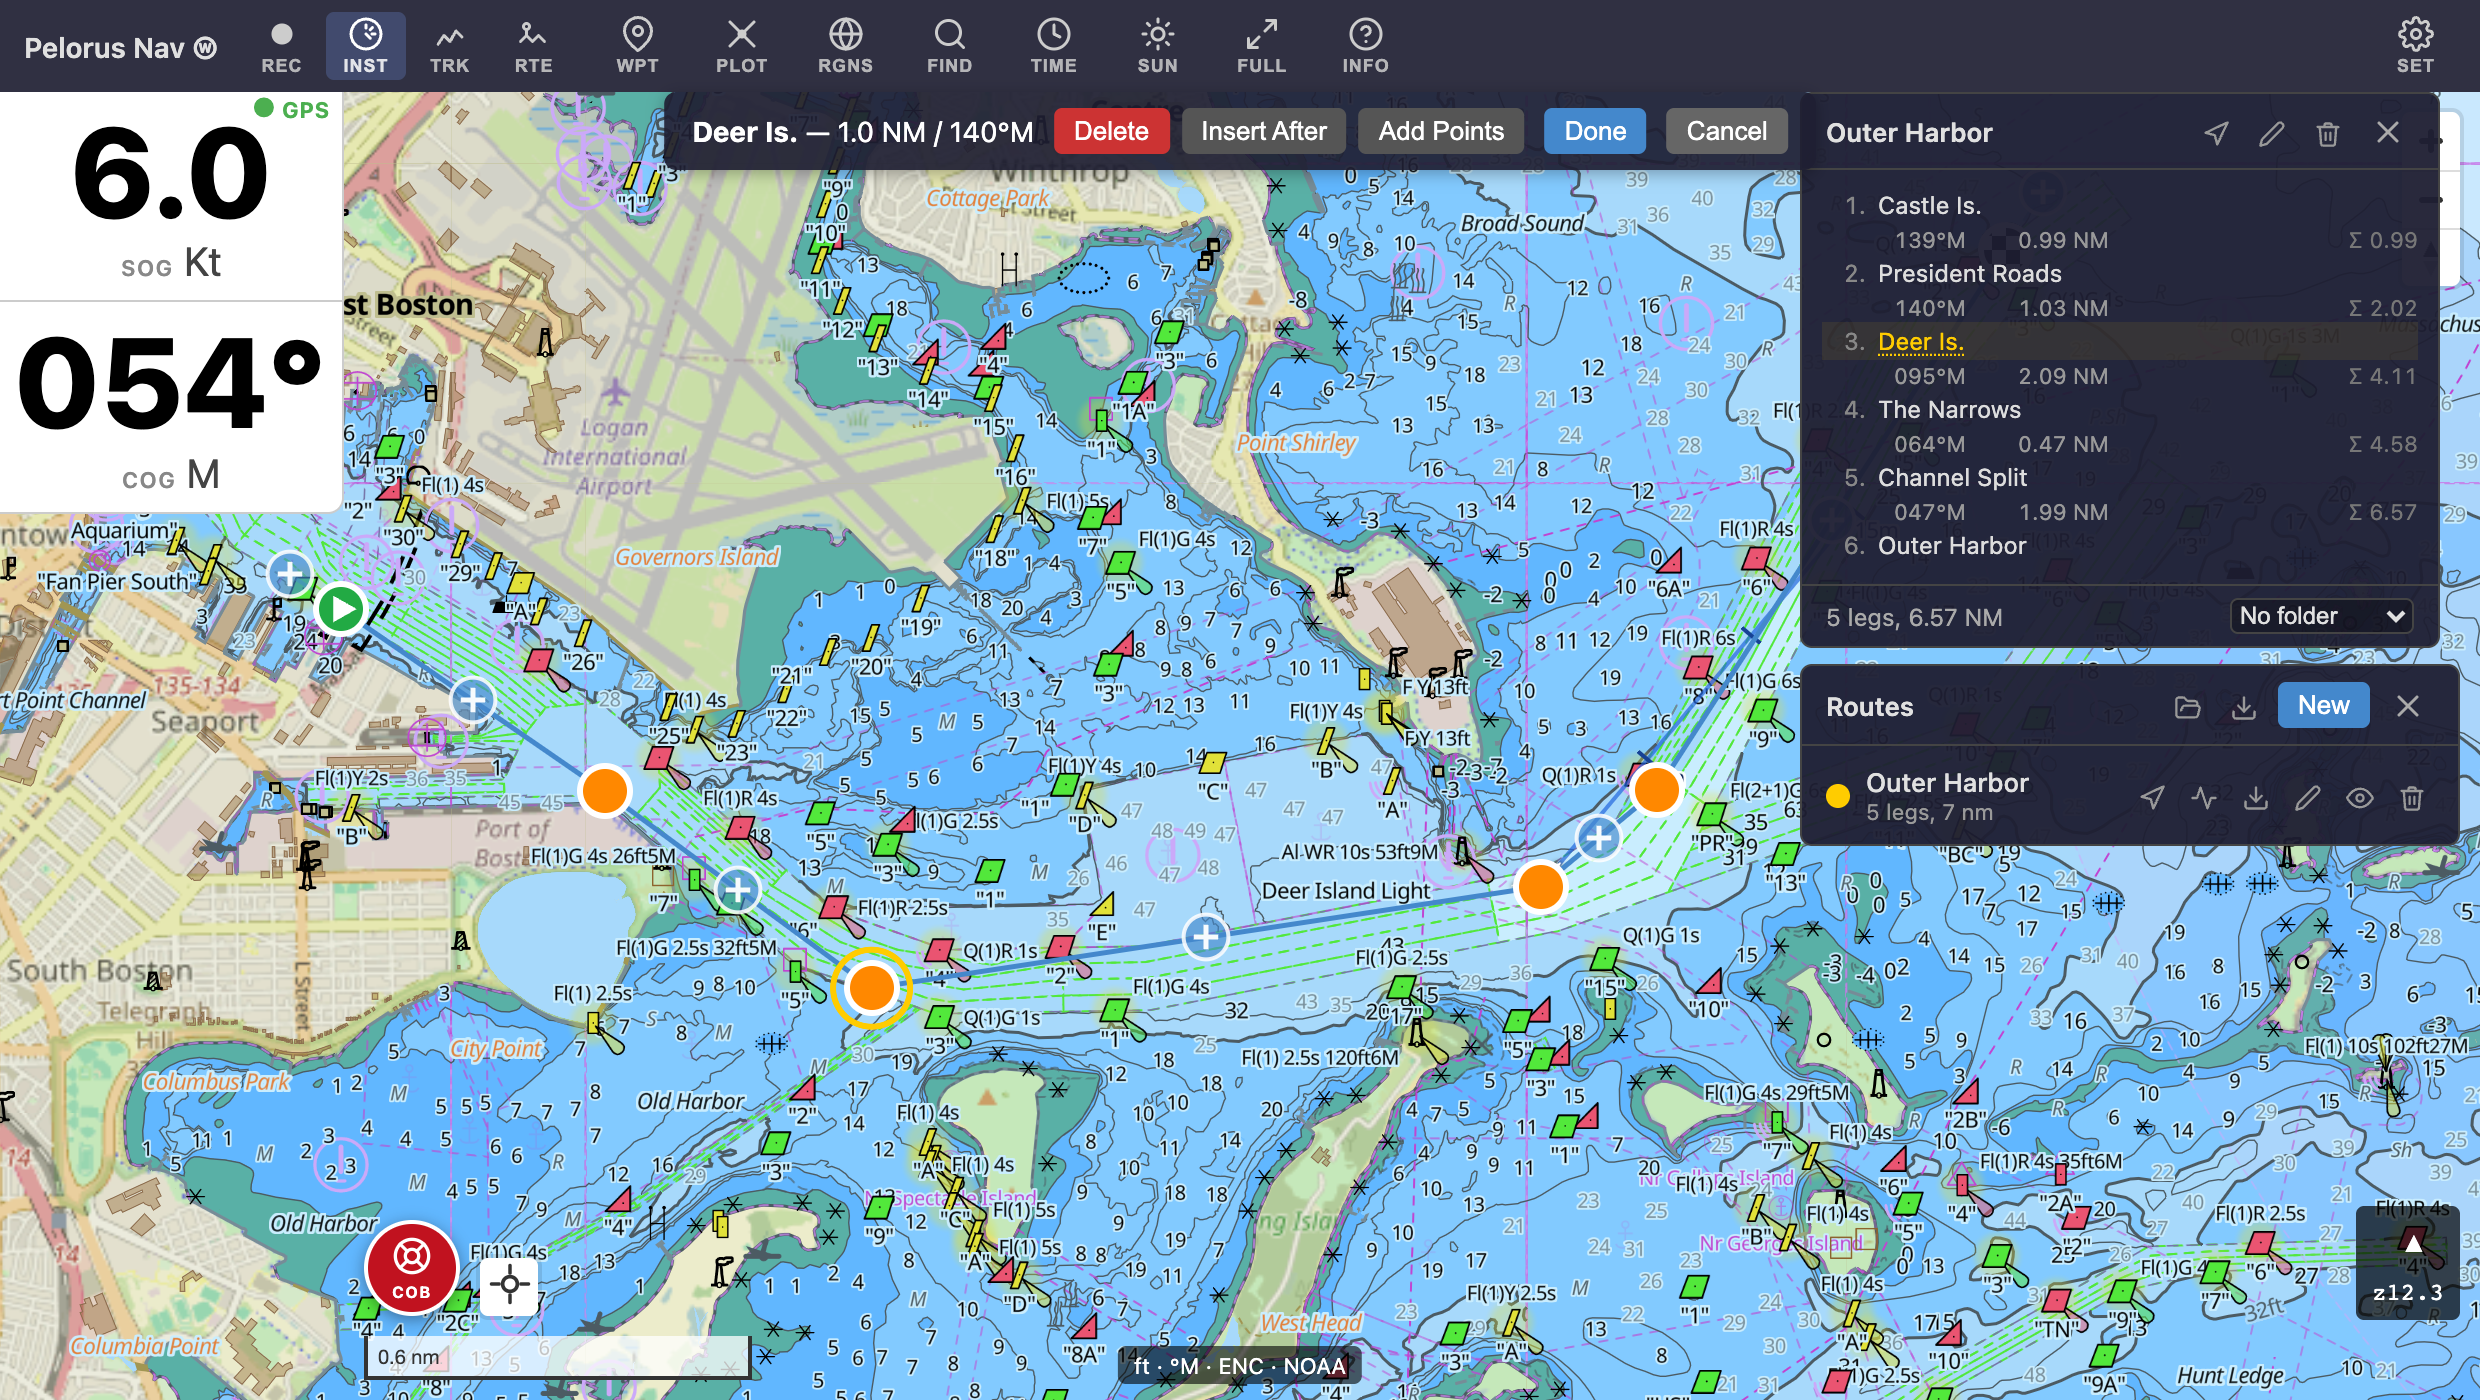
While editing:
- Add — turn on Add Points in the toolbar, then tap open water to append a waypoint at the end. It's lit while it's on. A route you're drawing starts with it on; an existing route opens with it off, so a mis-aimed tap can't hang a stray waypoint off the end.
- Move — drag any waypoint.
- Insert — ghost markers appear at each leg's midpoint, plus one just off each end of the route. Tap one to drop a waypoint there, or drag it straight to where you want the waypoint — the point is created and follows your finger in one motion. The end markers extend the route, before the first waypoint or after the last.
- Select — tap a waypoint (on the chart or in the list) to select it. The toolbar shows its name and leg data, plus Delete and Insert After buttons.
- Rename — double-click a waypoint's name in the list.
- Undo — the Undo button (or Ctrl/Cmd-Z) steps back through your edits.
Done saves; Cancel abandons all changes from this session.
Snapping to existing waypoints
While placing or dragging a waypoint, moving close to an existing one — a standalone waypoint, or a waypoint of another visible route — snaps it to exactly that position; a ring marks the target before you commit. This is how you build several routes that share a common stretch (say, the passage out of your home harbor) without near-duplicate lines cluttering the chart: identical positions render as one line and one marker.
Snapped waypoints are copies, not links — moving one later never affects other routes. The snap range is small and screen-based, so if it grabs a point you didn't want, just zoom in and place again; hiding a route also removes its waypoints as snap targets. A new waypoint can snap onto the route's own starting point, which is the easy way to close a loop that brings you home.
The Routes panel
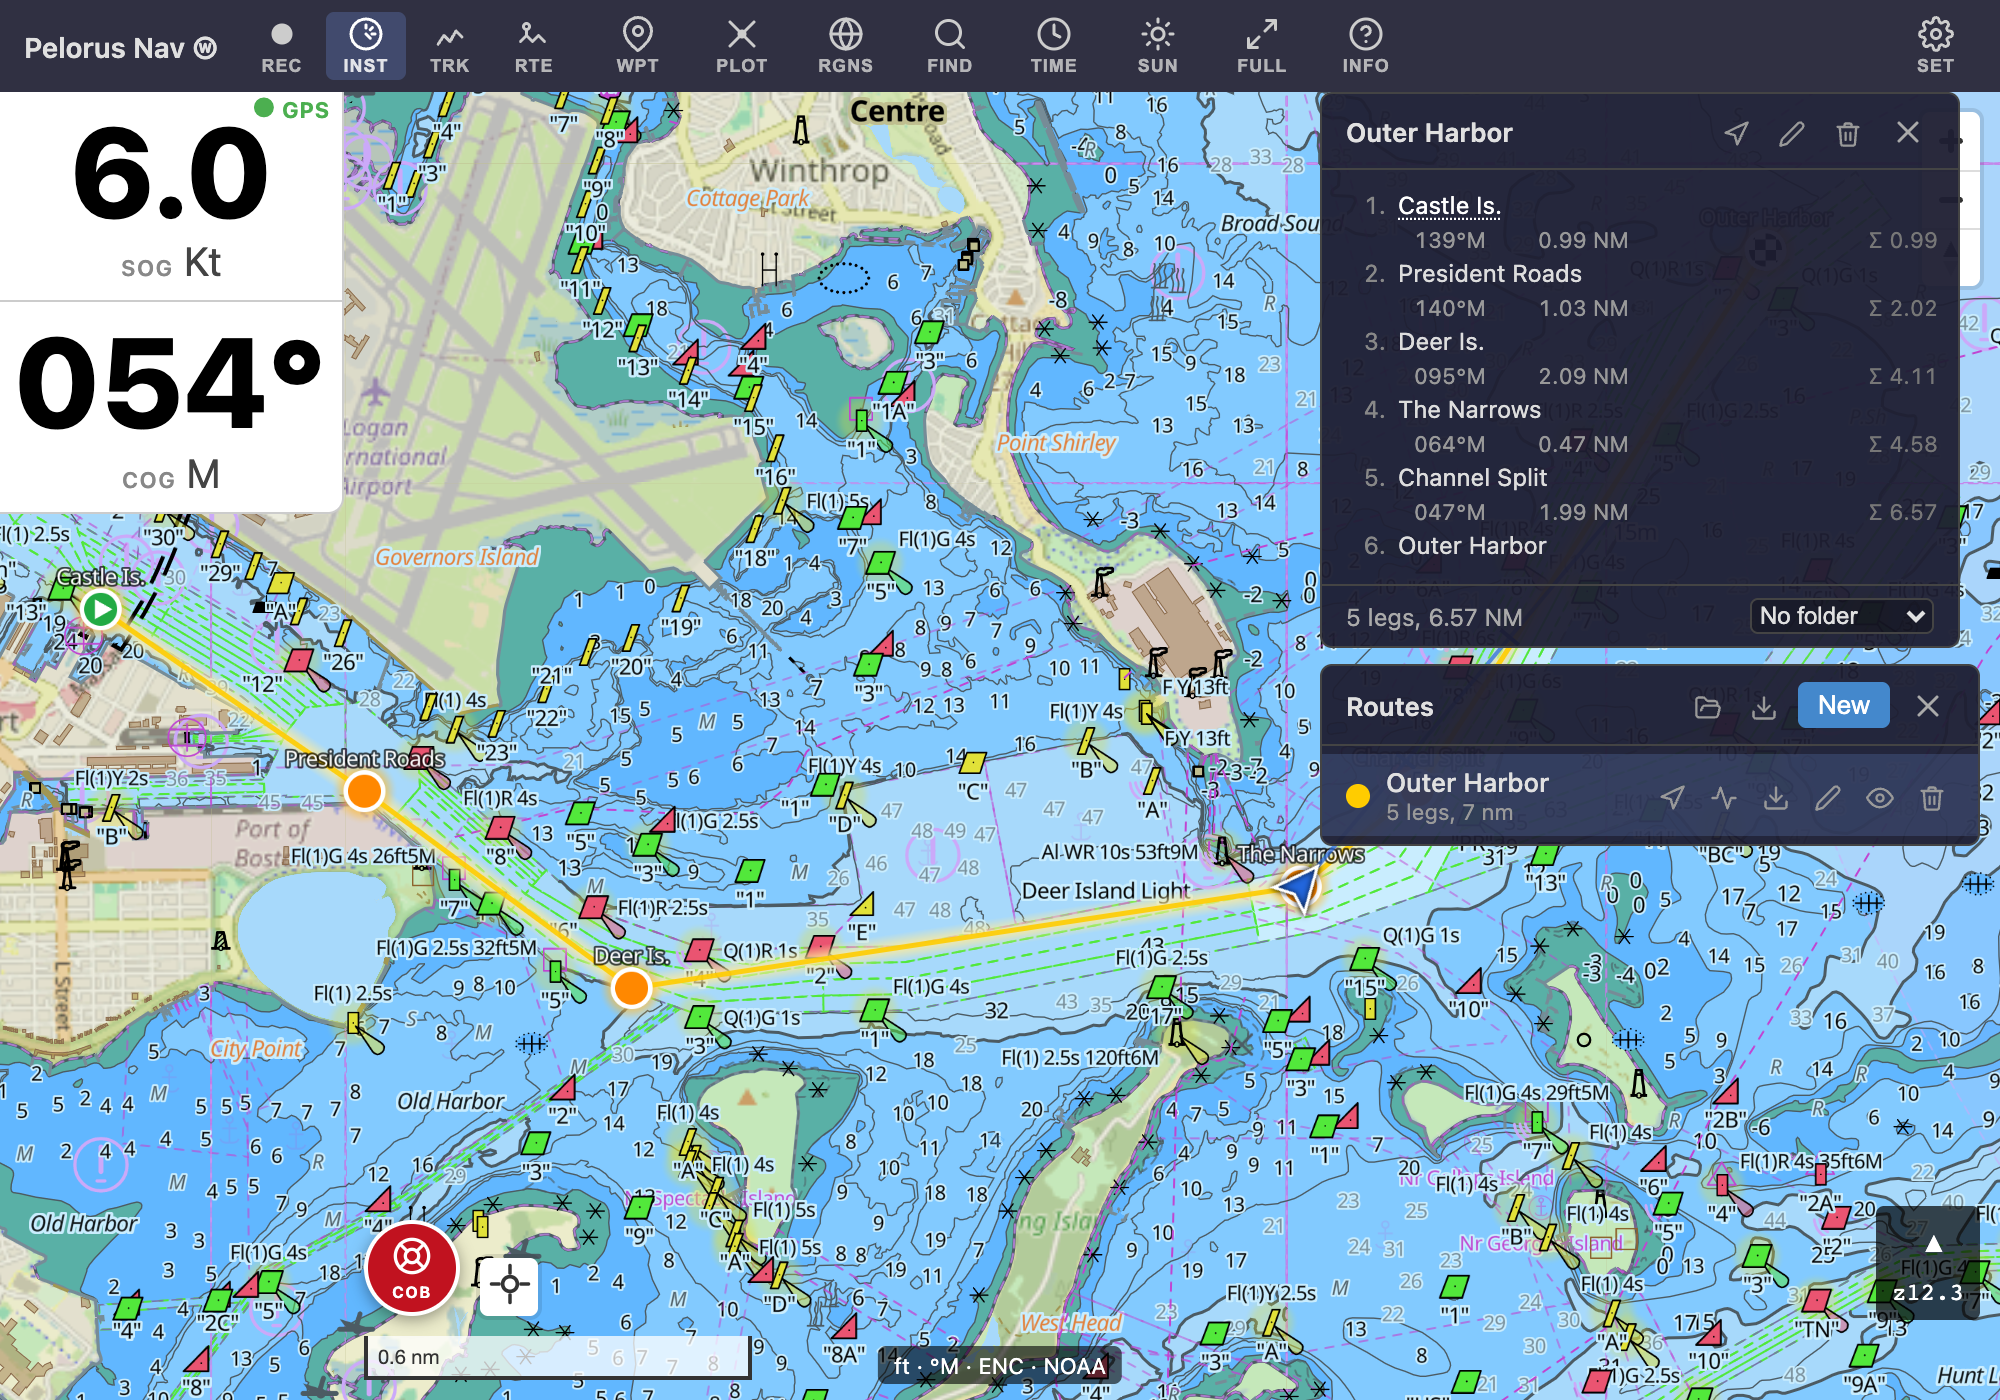
Selecting a route in the Routes panel opens its detail panel: the full waypoint list with each leg's bearing, distance, and cumulative distance — a passage plan you can read off directly. The summary at the bottom zooms the chart to the whole route. You can also tap a route right on the chart: its info card selects it and has a button to open it in this panel.
Per-route actions: navigate, preview (opens the route in the Track Viewer, where a planning speed gives you time estimates along it), export GPX, edit, show/hide on the chart, and delete.
Organizing with folders
Once you have more than a handful of routes, put them in folders. Select a route and use the dropdown at the bottom of its detail panel — pick an existing folder or New folder… to create one:
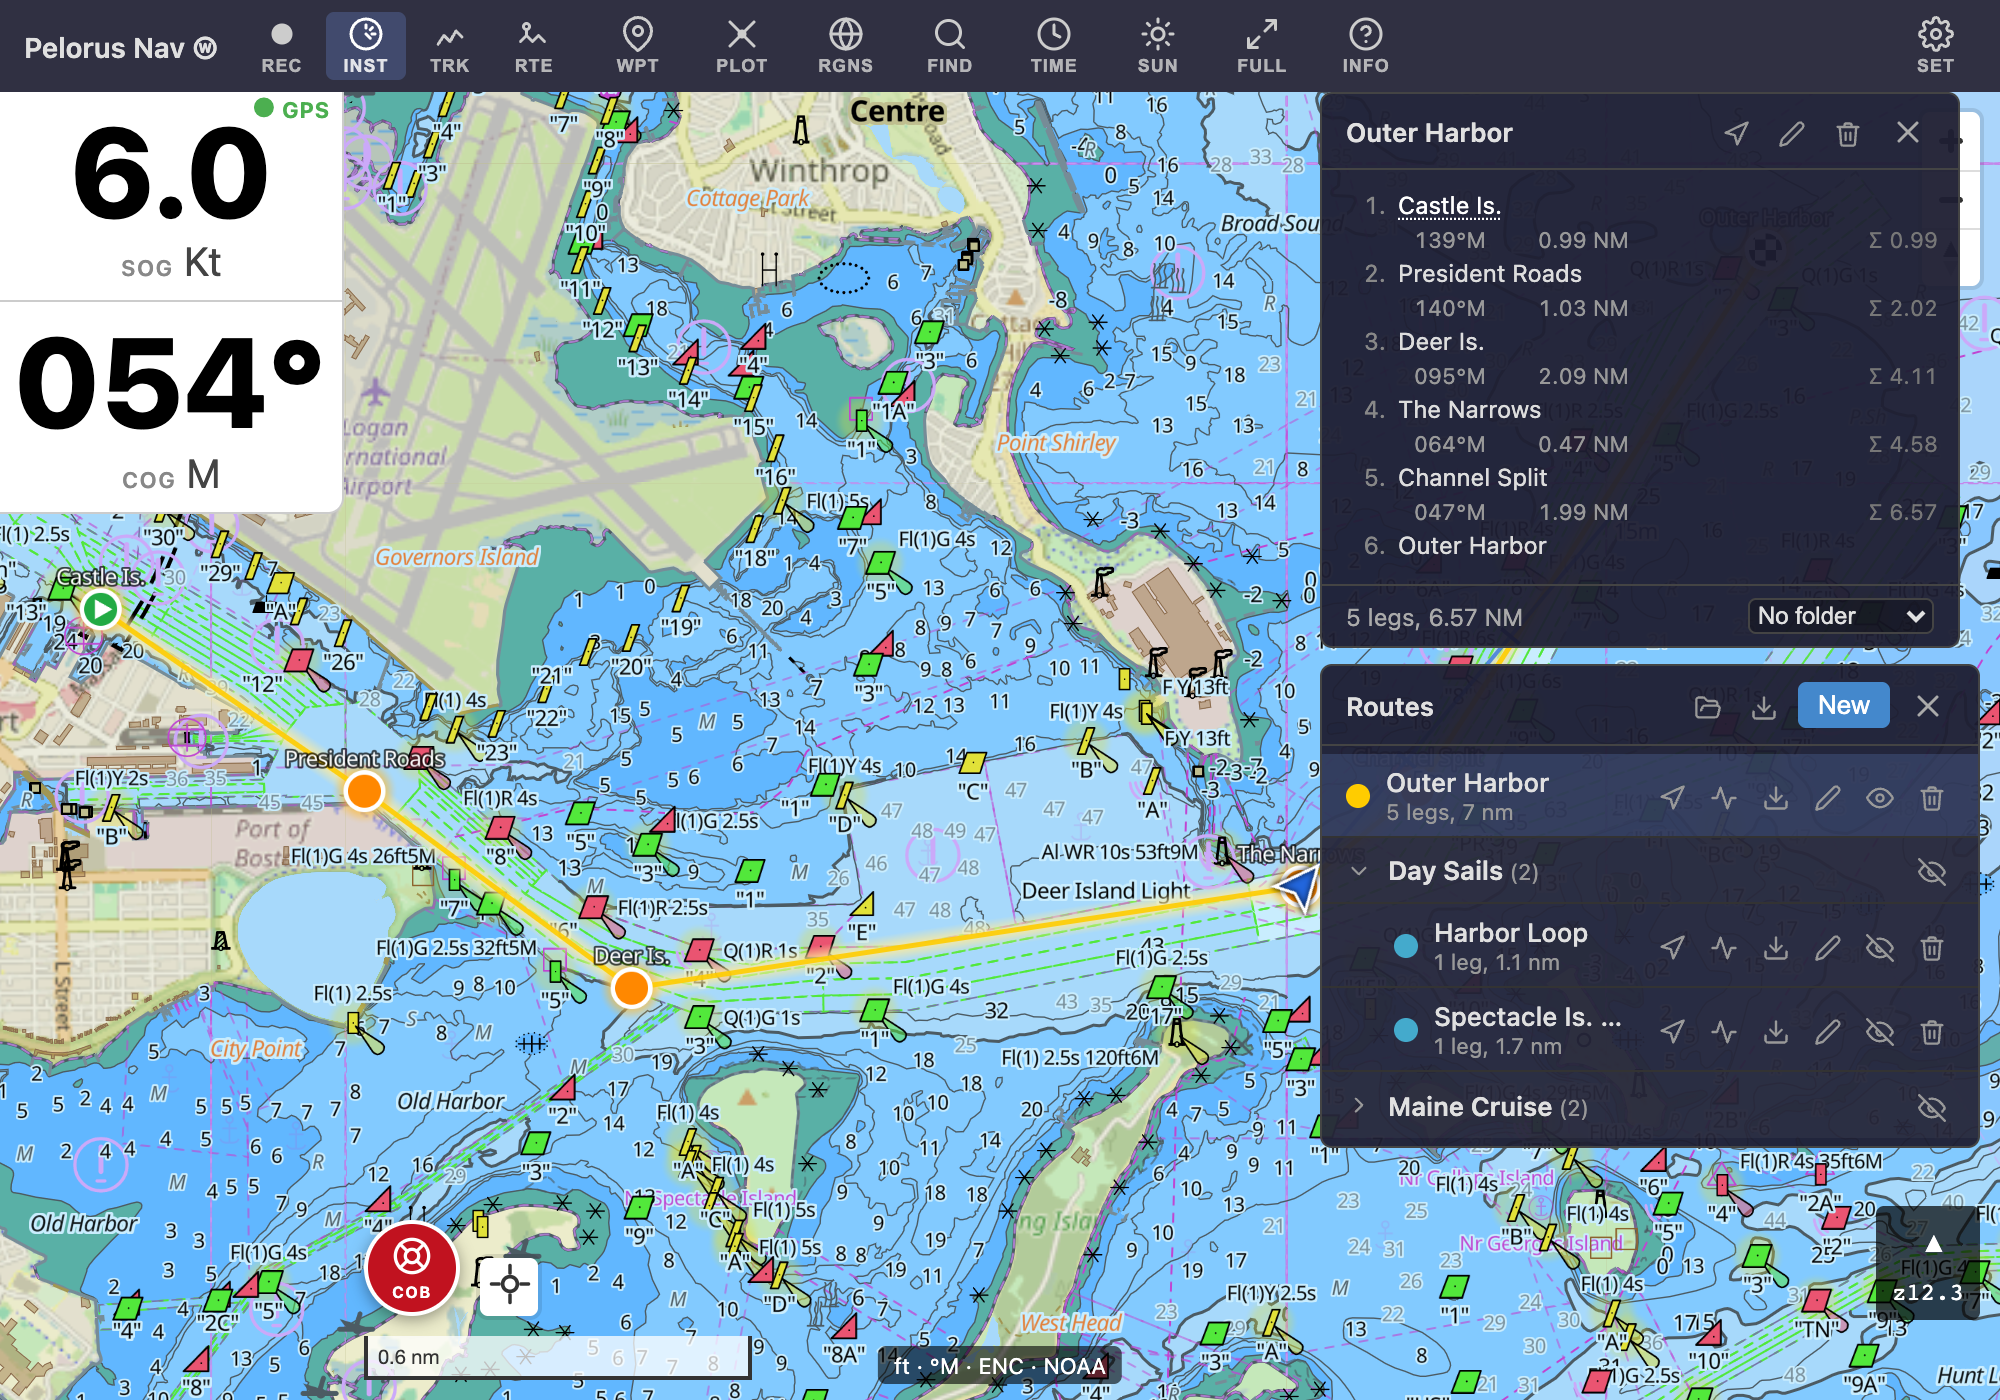
In the Routes panel, foldered routes group under collapsible headers with a route count — tap a header to expand or collapse it (the panel remembers which folders you keep closed). The eye button on a folder header shows or hides every route in it at once, so you can keep last summer's cruise legs filed away and invisible while today's routes stay on the chart. A route with no folder simply lists at the top.
A folder header also has a trash button, which deletes the folder and everything in it — the confirmation says how many, because a folder is only a label on its contents and there'd be nothing left of it otherwise.
Waypoints and tracks work the same way, with their own folders and their own collapse state.
Working on several at once
Filing routes one at a time is fine for a few and hopeless for fifty. The ticked-box button in the panel header — or a long press on any row — turns the list into checkboxes:

Tick what you want and the bar along the bottom acts on all of it: move to a folder, show, hide, or delete. Select All takes everything in the panel, including whatever is inside collapsed folders, and a folder header's own checkbox takes just that folder — which is the quick way to deal with an import you no longer want. Done (or the Escape key) leaves the mode; so does closing the panel.
While you're selecting, each row's own buttons step aside, so a tap can only ever mean "select this one". The Waypoints and Tracks panels have the same button and the same bar.
Export and import (GPX)
The panel header's import/export buttons read and write standard GPX files, and each route row can be exported individually:

The open-folder button imports; the button beside it exports every route at once. The same export button appears on each route row, third along, for that route on its own. In the phone and tablet apps it's your device's share symbol — the box with an up arrow on iPhone and iPad, the three joined dots on Android — and it opens the usual share sheet, where Save to Files puts the GPX where you want it. In a browser it's a download arrow instead, and the file lands in your downloads folder.
Two reasons to use them:
- Backup — routes live in the app's local storage on that device. Export All every so often and you can't lose a season's planning to a lost phone or a cleared browser.
- Moving between devices — there's no cloud sync (by design; it works offline). The comfortable workflow is to plan routes on a desktop with a big screen and mouse, export — Export All, or a single route's own export button — then import the file on the phone or tablet you navigate with. GPX is the standard interchange format, so the same files also move routes to and from other chartplotters and apps.
Importing needn't start in the app: open a .gpx file from Files, Mail, or a cloud drive and choose Pelorus Nav, and it loads straight in.
What happens when you import
Importing shows you what the file holds and what it means for what you already have, before writing anything:

If the file brings several new items, it offers to put them in a folder, named after the file when the file says what it is. Worth accepting for a big import — a download of somebody's cruising routes can be dozens at once, and a folder keeps them together and lets you clear them off the chart with one tap of its eye. Empty the name to skip it and they simply list on their own.
Re-importing the same file
Importing a file you have imported before does not give you a second copy of everything. Pelorus recognizes what it has already seen — by the identifier the file carries where there is one, and by the route's name and shape where there isn't — and updates those items in place instead of adding them again. An unchanged file writes nothing at all, and says so: "55 routes and 308 waypoints already up to date."
That makes a shared file a workable way to keep two devices in step: export from one, import on the other, as often as you like. When an item has changed on the far side, the file's version wins for the name and the shape, while this device keeps how you filed it — its folder, its colour, and whether it's currently shown on the chart.
A file from another chartplotter also keeps the things Pelorus itself doesn't use — OpenCPN's planned speed and arrival radii, the depth and water temperature a Garmin recorded at a mark — and writes them back out on export, so a file that goes home to the app it came from arrives intact.
Following a route
Tap the arrow (Navigate route) on a route's row or detail panel. The instrument panel grows a navigation section, and the chart highlights the active leg:
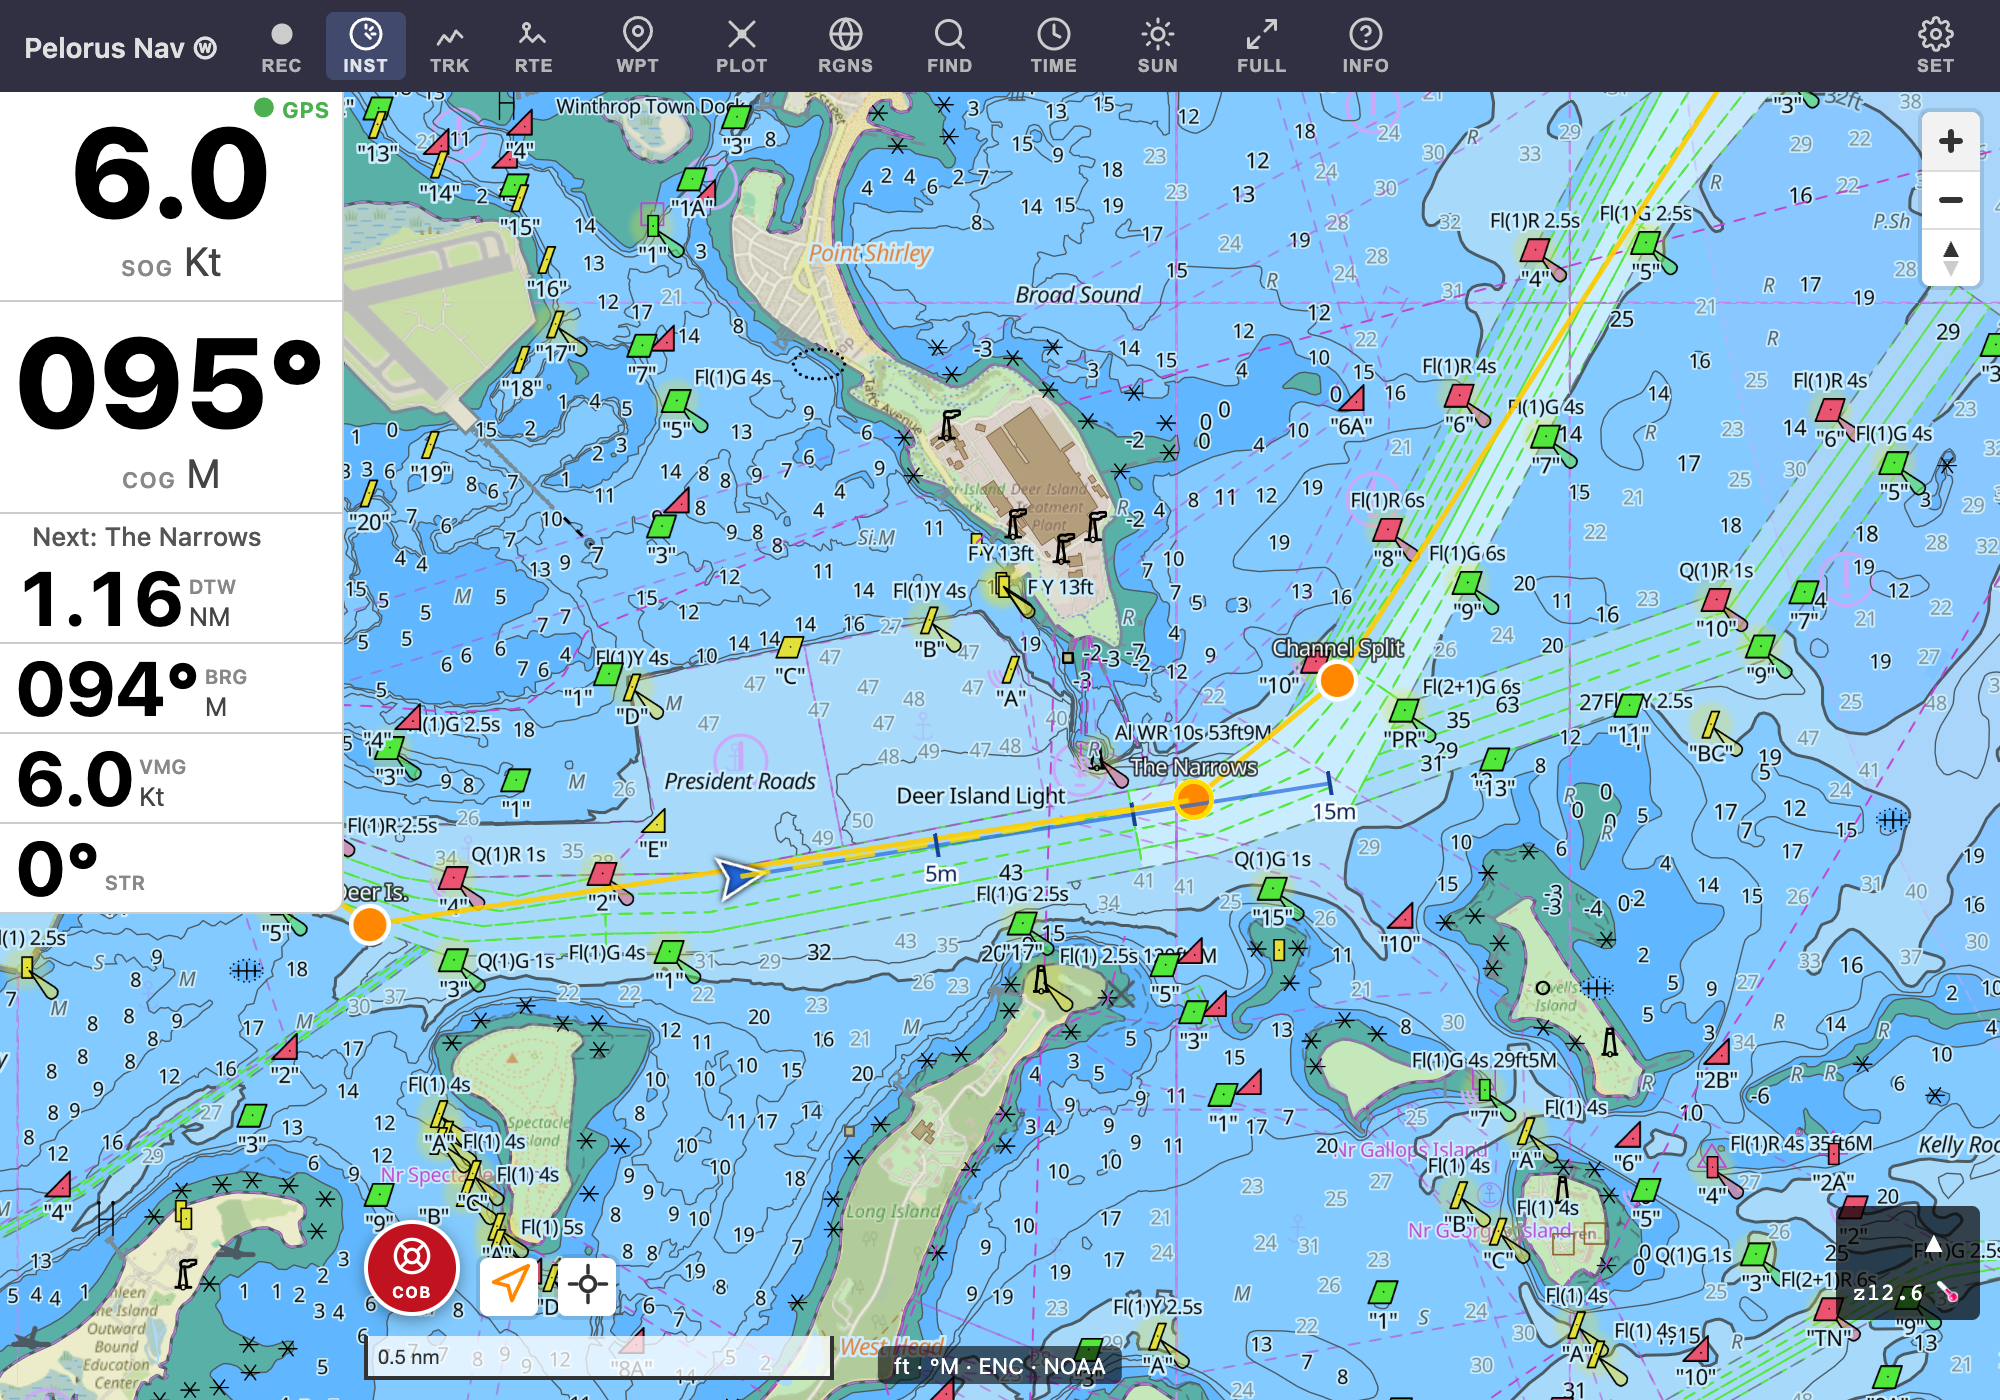
- Next — the waypoint you're steering for.
- DTW — distance to that waypoint.
- BRG — bearing to it, magnetic or true per your settings.
- VMG — your speed toward the waypoint; if it goes negative you're sailing away from it.
- STR — steer indicator: how far and which way to turn to point at the waypoint (
0°means dead ahead;←15°means come left fifteen degrees).
The orange dashed line runs from your vessel to the waypoint you're steering for; the solid blue line with time ticks is your projected course.
When you arrive at a waypoint (within the arrival radius of 0.1 NM), navigation advances to the next leg automatically, with a short two-tone beep and a notice (three notes at the last waypoint). Turn the beep off with Beep when passing a waypoint in Settings → Navigation.
You can start navigating from anywhere along a route: Pelorus steers for the leg ahead of you — the nearest leg whose next waypoint lies within about 75° of your course, so joining a route halfway needs no manual leg selection. If your course runs against the route's direction, a notice offers to reverse it. To pick a leg yourself, open the route's detail panel and tap the ► marker on the leg you want.
Stop navigating with the Cancel navigation button that appears at the bottom-left of the chart, the route's stop button, or the Escape key.
You can also navigate directly to a single waypoint without a route: open Waypoints and tap Navigate to on any waypoint, or drop one from the chart's context menu first. The same navigation instruments apply.